Windows 10 comes with a variety of great features, and one of them is the option to set your network as public or private, depending on your needs. If you set your network to Private make sure that you do that only for the networks you trust, as once you do this, your network will be discoverable and visible to other devices that are on the same network. Your PC then can be used for printer and file sharing. On the other hand, set your network to Public, your PC will be hidden from other devices that are on the same networks. In other words, it can’t be used for file and printer sharing. Now, let’s see how to change network from public to private in Windows 10.
See also: How To Reinstall Chrome On Windows 10
Steps to change network from public to private
Changing the network from public to private is very simple and requires just a few clicks.
Just keep in mind that in order to see the options we are going to list below and be able to make these changes, your PC needs to run Windows 10 Version 1709 or later.
Here is what you need to do:
- Click on the Wi-Fi network icon or monitor icon located in the bottom-left corner of the taskbar
- Next, click on Properties that is located under the name of the network you are connected to
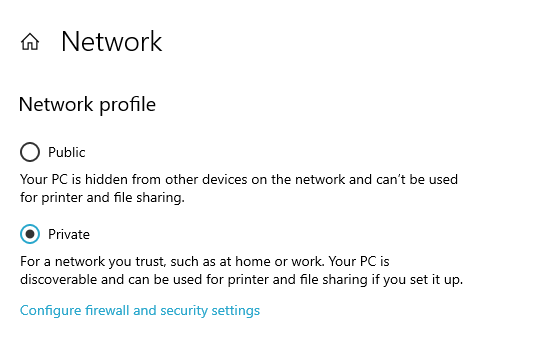
- You will see the Network profile and right under it you will see options Public and Private
- Click on Private
That would be all! You have successfully changed the network from public to private. If you want to go back to Public at some point, just follow the same steps and as a final one, click on Public.